
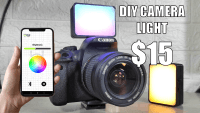
DIY Low-Cost Bluetooth Camera Light
Are you ready to learn how to build a DIY camera light that is controlled through Bluetooth from an Android app? In this article, I will show you step-by-step how to build a camera light using electronics and DIY techniques that are affordable and easy to replicate.
Why Build Your Own Camera Light?Before we start, you may be wondering why you should build your own camera light. The answer is simple - buying a color controllable lightning gadget can be expensive, so building your own is a cost-effective solution. Plus, by building it yourself, you can customize it to your exact needs and preferences.
What You Will Need:
- AVR Atmega328p (similar to the MCU of Arduino Nano board)
- WS2812B Addressable RGB LEDs (12 LEDs)
- Power source (3 rechargeable batteries)
- Bluetooth module
- Altium Designer software
- CH340 USB to TTL converter
- USB C connector
- 3D printer
- White mat plexiglass
- Android phone with Bluetooth capabilities
Step 1: Planning and DesigningThe first step in building a DIY camera light is planning and designing. The components you will need include an AVR Atmega328p, WS2812B Addressable RGB LEDs, a power source (3 rechargeable batteries), a Bluetooth module, and other small parts like a USB C connector and a slide switch.
Once you have gathered all the required components, you can start designing the circuit using software like Altium Designer. Start by arranging the LED pixels in a 7 by 6 matrix, and ensure each LED has a 100nF bypass capacitor. Place the microcontroller and its necessary crystal, USB data line, batteries bracket, and Bluetooth connector in the design.
Step 2: Ordering and AssemblingAfter designing the circuit, you can export the Gerber files and upload them to a PCB manufacturer like JLCPCB to place a PCB order. Make sure to order the top and bottom stencil to help with board assembly. Once the PCBs are delivered, use the stencil to deposit solder paste on the top side of the board and place the bypass capacitors and RGB LED pixels. Use a hot plate to complete the assembly, then clean the board with flux removal solvent.Next, repeat the process for the bottom side of the board, except use a low-temperature profile solder paste to keep the top side components connected. Reflow the bottom side of the board using a hot air soldering station. Solder the Bluetooth module and ensure to set a customized Bluetooth name to identify the device.
Step 3: Programming and TestingUse a header connector to select whether to use the serial port for programming or Bluetooth communication. Place the jumper in the programming position to upload the code to the device using the USB cable, then place it in the Bluetooth position to activate Bluetooth communication. Use the Arduino IDE software to upload the code and set the device to receive serial data to control the Pixels' color and brightness continuously.
Step 4: HousingTo complete the device assembly, design the top and bottom covers using a 3D printer. Use 3mm threaded inserts to assemble the device housing, and attach a white mat plexiglass screen to the top side of the gadget.
Step 5: Android AppLastly, create an Android app to control the color and brightness of the camera light using a color palette and slider. Connect the phone to the camera light using Bluetooth, and you're ready to start taking amazing photos and videos!
Conclusion:Building your own DIY camera light that is controlled through Bluetooth from an Android app is easy, affordable, and a fun project to undertake. With just a few components and some basic electronics knowledge, you can build a custom camera light that meets your exact needs and preferences.
Discussion (2 commentaire(s))