
Bluetooth LED Controller With GlowDuino
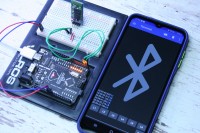
Ever wanted to control LEDs from your phone? This project is an easy way to control six of them with just a few basic components. And in case you wish to replace the LEDs with something else, you can do that as well.
You only need a few things for this project to get started:
-A GlowDuino Uno board for display: https://www.glowduino.com/shop/p/unoOr at:https://www.tindie.com/products/glowduino/glowduino-uno-a-better-arduino/-An HC-06 Bluetooth module: https://amz.run/6teo-A breadboard: https://amz.run/6tet-A few jumper wires:https://amz.run/6tes
1)
To receive and process the commands, you need to upload the code given. Here you can change the character that controls the outputs, and you can change the pins used for outputs.
Load the program into the Arduino IDE software and upload it to your GlowDuino board.
If you wish to re-upload a modified program, make sure to disconnect the Bluetooth module, so the module does not interfere with the serial lines.
2)
The HC-06 Bluetooth module uses Uart to communicate. With this, the module has four pins: Two pins for power and two for data.
To connect the module to the microcontroller, you will need to determine the module's pinout. It is either the one in this picture or if you are using a similar module but with more pins, then you can find the pinout on the back side of your module.
In any case, you will need to provide the module with 5V, and you will need to connect the two data lines: Tx to the RX pin of the microcontroller, and Rx to the TX of the microcontroller. This way it can both receive and send data via Bluetooth.
Since the Bluetooth module does not work with 5V data lines. One advantage of a GlowDuino board here is the integrated level shifter. With no extra components, you can just set the output voltage with a switch. For this module as well, you will need to switch the level shifter switch on the GlowDuino board to 3.3V to avoid damage to your module.
3)
With the wiring done, all that is left is to connect your phone to the Bluetooth module. For that, you will need to download a Bluetooth terminal app for your phone.
To have easily usable buttons, you can use this app: https://play.google.com/store/apps/details?id=de.kai_morich.serial_bluetooth_terminal&hl=hu&gl=US
Once installed, open the app and search for the item "HC-06" in the list of devices. Press connect and wait for the connection to be established. Once connected, the app will display "Connected".
With the connection established, everything you type on the phone will be sent over to the microcontroller.
4)
Once connected, you can use the premade buttons at the bottom of the screen to switch the LEDs. These buttons contain a number, which corresponds to the given output pins of the microcontroller. Pressing these buttons will send over their content via Bluetooth, which can be read with the serial function of the GlowDuino. Analyzing each character with a simple row of "If" statements, the microcontroller can determine which button you pressed. One by one, the buttons will toggle the outputs, according to the trigger numbers from 1 to 6, thus controlling anything connected to them.
And with that being done, now you have a versatile wireless Bluetooth switch that can be used for a variety of things.
5)
In case you wish to control something other than LEDs, you can connect a relay module to the output of the GlowDuino board. The indicator LEDs will still signal when the output is ON or OFF, but you will have a way to control higher-power appliances and lights.
If you are using a relay module, the wiring is simple and easy. These modules have their pin labeled, which you will have to match with the corresponding pins on the microcontroller. +5V and GND are needed to power the modules, and each of their control pins (usually labeled with "in1" or similar) needs to be connected to one of the controlled output pins of the microcontroller. Once you connect them to the microcontroller, the relays can switch all sorts of things easily with just the output from the microcontroller.
How does the code work?
The terminal app on your phone has preprogrammed buttons. With a long press on these, you can change the content they send through. In any case, these will contain a number that you can program the receiver to look out for. In this case, it is the numbers from 1 to 6.
Since the program uses serial to receive the signals, each character is received one after the other. By using a "while" loop, the program can read through the incoming characters, and in each cycle, it can determine if it is a character it is looking for. This is achieved with a series of if statements where in each statement the program determines whether the character is the number you defined. If yes, it will enter the function and execute the code written in it. By default, this code piece will check the status of the output with a digitalRead() function and will turn the pin to the opposite state. Effectively making a toggle button on your phone.
After running the code in the if statement, it will go back to the main loop and wait for the next character to arrive at the Bluetooth module.
Simple and easy to understand.
Want to build a project?
Bring your design to life with the Elektor PCB Service, powered by Eurocircuits. Upload the project files and order professionally manufactured PCBs or assembled boards through a proven European production platform.
Supporting KiCad, Eagle, Gerber, and ODB++ formats, the service is suitable for everything from prototypes and validation builds to series production and volume manufacturing.
Made in Europe. Fast. Reliable. Professional.
Discussion (0 commentaire(s))