
ESP32 Internet Radio
Once you understand VS1053 codec processor , with just 15 lines of code you can build up your Internet radio running on your WIFI internet connection.
ESP32 Internet Radio
The cheap MP3 VS1053 codec processor that has come from aliexpress.com is told to be capable of decoding a variety of music formats, including Ogg Vorbis/MP3/AAC/WMA/MIDI audio, was lying on the table for quite sometime. VS1053 is also capable of recording in Ogg Vobis file but all the guidance that are available on Internet are either for proprietary boards or for ESP32-IDF which I hate to try due to excessive coding. A code more than 20 lines is enough to drive me out 100 miles !
The Idea:
The Internet radio on ESP32 was an interesting project but due to lack of understanding of the board or the codec format I was so far unable to tweak the board until one day I got the idea that if I can deliver a chunk of streaming data in exact quantity of 32 byte to the board in the form of stream, it will just keep on playing.
That means the ESP32 is to connect the streaming site at the fixed port and then receive the streaming data in an exact chunk of 32 byte at a time. On the other hand the board will keep on processing the data like an inflow / outflow machine and the stream will continue to play.
The main code is hardly 15 lines long !
Construction: The open source ESP32 VS1053 library is used , You can find a few examples included in the library. For changing stations I’ve used a GPIO (D13 ) pin as a push-to-on-switch to soft Reset the VS1053 board to tune in to the next station. For bounce free switching operation I’ve kicked in a boolean operator to become ‘false’ & ‘true’ alternatively to prevent multiple switching on single press of button.
VS1053 is a 5Volt device but you can easily rig it to operate on 3.3 volt as well. That way on ESP32 radio you will have only one supply voltage – 3.3volt, which can be fed from one LiPo battery. There are two voltage regulators [AM1117] on the VS1053 board – 3.3 volt and 2.5 volt. With a digital multi meter first find out which one is for what and then connect a jump wire from 3.3 volt to the input of 2.5 volt regulator and make that lead as 3.3 volt input to the board [see pic].
VS1053 wiring: Keep the connecting wires as small as possible. Longer, lengthy and overlapping wires may produce humming noise to the sound output which I’ve experienced with these kinds of boards. The sound out is stereophonic and amplified enough to power small speakers or ear phone but for running bigger speakers you may have to add amplifiers / ampli boxes.
Construction hurdle: A Li-Ion / Li-Po or a Li-Ion when fully charged can ramp up voltage to 4 which will not damage the ESP32 but you may loose the VS1053 board and then wait for another 40 days to arrive from aliexpress.com. Therefore, I recommend you to use a low power, low loss HT7333-1 3 pin voltage regulator which has very low drop out voltage and very low quiescent current loss. But the only problem is HT7111-1 is a tiny surface mount device. No problem , call me and keep my fees ready ,I will solder it for you !
Schematic with ( OLED – Optional) :
The rigged up 3.3 volt is connected to the output of HT7333-1 which is also the input power for ESP32.
Prototype:
[The red circled connection will go to the push-to-on switch - it’s a makeshift push-to-on switch now]
Testing: For connecting to the WiFi system ,replace the SSID & Password to the beginning of the code and then upload in the normal Arduino way. Once uploaded the ESP32 will first say ‘Hello’ to indicate that the VS1053 is up and ready. It will then wait for couple of seconds to get connected [ Keep an watch on the Serial output ] of the computer. Once on the Internet it will then tune to the station in host[6] and then the beautiful streaming voice of Beatles will start pouring in. Press the switch once [connected to D13] and the next station will be tuned. I’ve found quite a few good stations listed in the comment portions which you would love to listen right away! The char *sname[7] variable is optional. You can have your choice names against each radio stations which I’ve set for myself. Additional station names can be added in the host, path and port arrays.
ESP32 Radio with OLED (Optional) : The only problem left is – no display to know which station is playing! An I2C generic display is all that is required now to make it all complete now. But the problem is that the heavy weight Adafruit SSD1306 along with Adafruit_GFX library if used will make the sound jarring. Therefore, I’ve used a light weight SSD1306 library esp8266-oled-ssd1306-master which is particularly made for ESP8266 to run SSD1306 generic OLED displays. With this library the I2C display works just fine without any effect on the sound output. However, the OLED is optional – The radio works just fine without it !
BOM:
ESP32 $7.5
OLED 64*128 - $3
VS1053 codec shield - $6
HT-7333-1 -$1
8 Ohm speakers (0.3 watt) extra.
Softwares: I’ve added two sketches – bare_minimum_radio_player.ino & simple_esp32_radio_mod3.ino The first one is just a few lines of code to get a 32 byte data from a streaming site and then play. The 2nd one is an elaborate sketch to run the radio along with an OLED display and a push-to-on switch to change the station. Each sketch is accompanied with a small ‘helloMP3.h’ file which is actually code for a small music or a sound greeting. Compile the sketch along with this file.
The necessary arduino libraries are also added in the software bundle.
Bera S
Vindhyanagar
The cheap MP3 VS1053 codec processor that has come from aliexpress.com is told to be capable of decoding a variety of music formats, including Ogg Vorbis/MP3/AAC/WMA/MIDI audio, was lying on the table for quite sometime. VS1053 is also capable of recording in Ogg Vobis file but all the guidance that are available on Internet are either for proprietary boards or for ESP32-IDF which I hate to try due to excessive coding. A code more than 20 lines is enough to drive me out 100 miles !
The Idea:
The Internet radio on ESP32 was an interesting project but due to lack of understanding of the board or the codec format I was so far unable to tweak the board until one day I got the idea that if I can deliver a chunk of streaming data in exact quantity of 32 byte to the board in the form of stream, it will just keep on playing.
That means the ESP32 is to connect the streaming site at the fixed port and then receive the streaming data in an exact chunk of 32 byte at a time. On the other hand the board will keep on processing the data like an inflow / outflow machine and the stream will continue to play.
The main code is hardly 15 lines long !
Construction: The open source ESP32 VS1053 library is used , You can find a few examples included in the library. For changing stations I’ve used a GPIO (D13 ) pin as a push-to-on-switch to soft Reset the VS1053 board to tune in to the next station. For bounce free switching operation I’ve kicked in a boolean operator to become ‘false’ & ‘true’ alternatively to prevent multiple switching on single press of button.
VS1053 is a 5Volt device but you can easily rig it to operate on 3.3 volt as well. That way on ESP32 radio you will have only one supply voltage – 3.3volt, which can be fed from one LiPo battery. There are two voltage regulators [AM1117] on the VS1053 board – 3.3 volt and 2.5 volt. With a digital multi meter first find out which one is for what and then connect a jump wire from 3.3 volt to the input of 2.5 volt regulator and make that lead as 3.3 volt input to the board [see pic].
VS1053 wiring: Keep the connecting wires as small as possible. Longer, lengthy and overlapping wires may produce humming noise to the sound output which I’ve experienced with these kinds of boards. The sound out is stereophonic and amplified enough to power small speakers or ear phone but for running bigger speakers you may have to add amplifiers / ampli boxes.
Construction hurdle: A Li-Ion / Li-Po or a Li-Ion when fully charged can ramp up voltage to 4 which will not damage the ESP32 but you may loose the VS1053 board and then wait for another 40 days to arrive from aliexpress.com. Therefore, I recommend you to use a low power, low loss HT7333-1 3 pin voltage regulator which has very low drop out voltage and very low quiescent current loss. But the only problem is HT7111-1 is a tiny surface mount device. No problem , call me and keep my fees ready ,I will solder it for you !
Schematic with ( OLED – Optional) :
The rigged up 3.3 volt is connected to the output of HT7333-1 which is also the input power for ESP32.
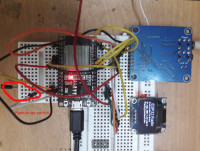
Prototype:
[The red circled connection will go to the push-to-on switch - it’s a makeshift push-to-on switch now]
Testing: For connecting to the WiFi system ,replace the SSID & Password to the beginning of the code and then upload in the normal Arduino way. Once uploaded the ESP32 will first say ‘Hello’ to indicate that the VS1053 is up and ready. It will then wait for couple of seconds to get connected [ Keep an watch on the Serial output ] of the computer. Once on the Internet it will then tune to the station in host[6] and then the beautiful streaming voice of Beatles will start pouring in. Press the switch once [connected to D13] and the next station will be tuned. I’ve found quite a few good stations listed in the comment portions which you would love to listen right away! The char *sname[7] variable is optional. You can have your choice names against each radio stations which I’ve set for myself. Additional station names can be added in the host, path and port arrays.
ESP32 Radio with OLED (Optional) : The only problem left is – no display to know which station is playing! An I2C generic display is all that is required now to make it all complete now. But the problem is that the heavy weight Adafruit SSD1306 along with Adafruit_GFX library if used will make the sound jarring. Therefore, I’ve used a light weight SSD1306 library esp8266-oled-ssd1306-master which is particularly made for ESP8266 to run SSD1306 generic OLED displays. With this library the I2C display works just fine without any effect on the sound output. However, the OLED is optional – The radio works just fine without it !
BOM:
ESP32 $7.5
OLED 64*128 - $3
VS1053 codec shield - $6
HT-7333-1 -$1
8 Ohm speakers (0.3 watt) extra.
Softwares: I’ve added two sketches – bare_minimum_radio_player.ino & simple_esp32_radio_mod3.ino The first one is just a few lines of code to get a 32 byte data from a streaming site and then play. The 2nd one is an elaborate sketch to run the radio along with an OLED display and a push-to-on switch to change the station. Each sketch is accompanied with a small ‘helloMP3.h’ file which is actually code for a small music or a sound greeting. Compile the sketch along with this file.
The necessary arduino libraries are also added in the software bundle.
Bera S
Vindhyanagar
Discussion (4 commentaire(s))