
Raspberry Pi sonar distance measuring Robot - a walking aid [150401]
Raspberry Pi distance measuring robotics - Blind man's aid For Games, Microsoft Windows is king, for networking Linux or Unix is king but for small scale automation where power consumption is a major factor, Raspberry Pi has got a place now. Arduino can do to a certain extent but Arduino is a mere microprocessor, it can be a perfect slave but not a master like Raspberry Pi. Raspberry Pi can monitor, administer and can also execute.
For Games, Microsoft Windows is king, for networking Linux or Unix is king but for small scale automation where power consumption is a major factor, Raspberry Pi has got a place now. Arduino can do to a certain extent but Arduino is a mere microprocessor, it can be a perfect slave but not a master like Raspberry Pi. Raspberry Pi can monitor, administer and can also execute.
The following article will describe how to make Raspberry Pi computer a distance measuring robot who will greet, measure, speak the value of measurement and then check if the value crosses a limit or not and then fire up GPIO activated relays according to the caution note. This project can be packaged into a perfect assistance to blind people while walking or in move. The relay outputs can be converted into vibrating motors to raise the suitable alarms.
Hardware
Normal HC-SR04 type 4 leg sonar distance sensor, Raspberry Pi computer – Model A / B with Raspbian Wheezy operating system, 2*16 character LCD panel (Hitachi HD 44780 compatible) , Resistor: 1K OHM , 330 OHM & 470 OHM, Semiconductor: MC23008, BC547, Ultrasonic distance measuring probe HC-SR04 or compatible, wires, female cords etc. 5Volt Relay – 02 nos , Amplifier - to amplify audio output . However, in lieu of amplifier a pair of earphone can be used. The 2*16 character LCD panel is optional.
Software
Since our Raspi will be speaking a lot of voices in many languages we need to install a voice synthesizer program now. There are many voice synthesizer software available in Internet but out of them 'espeak' is the most versatile software besides it's being free. The other voice synthesizer softwares are – Festival , pico & cepstral (http://www.cepstral.com/raspberrypi).
eSpeak produces good quality English speech. It uses a different synthesis method from other open source text to speech (TTS) engines, and sounds quite different. It’s perhaps not as natural or “smooth”, but it's articulation is clearer and easier to listen to for long periods.
$> sudo apt-get update
$> sudo apt-get upgrade
$> sudo apt-get install alsa-utils
Now edit the /etc/modules file to include the following line beside it's other lines.
$> sudo nano /etc/modules
snd_bcm2835
Save nano by ctrl+o and then exit by ctrl+x
$> sudo reboot
The last command will reboot the Raspi.
Now complete the installation by adding the following softwares.
$> sudo apt-get install mplayer
$> sudo apt-get install espeak
$> sudo apt-get install espeak-gui
To know about manual of espeak.
$> man espeak
or
$> espeak --h
The last command will give you detail options about how to use espeak. Before testing espeak, put an amplifier with the Raspi audio socket as the normal audio output does not have enough power to drive more than an earphone. By running eskeap-gui you can set the choice of your language to speak about by espeak synthesizer.
Few examples are here.
$> espeak “Hello Guys, welcome to EFY” // male voice
$> espeak -ven+f3 "Hello, Welcome to EFY” // female voice
$> espeak -ven+f3 -k9 -s150 -a200 "Hello Guys, Welcome to EFY” //high pitched , well spaced, maximum amplitude female voice
The other software that we need for this project is rpi-gpio. The present version of rpi-gpio can be checked at http://raspberry-gpio-python.googlecode.com/files/, download the latest version and then install it which is just a few clicks away.
The 16*2 hitachi LCD panel is used on an I2C bus as it makes the wiring neat and clean leaving more GPIO pins free for use. For I2C I've used MCP23008 (see older EFY where the project was described - However, to help you further with MCP23008 the guidance doc file may be read) else any other compatible I2C LCD display may be used. However, the LCD module is optional here. Without that the remaining part of the project will still work.
Schematic
The project has used 6 GPIO pins of Raspberry pi computer. The physical pin numbers has been shown in the schematic diagram. The GPIO pin 3 & 5 are the I2C bus of the Raspi – SDA & SCL pins. Pin 2 & 6 are the +5 volt and Gnd connections. Remaining 11, 12, 23 & 24 pins are the GPIO- 17, 18, 25 & 8 which have been used in the program. The 5 volt relays are connected using BC547 as switches. The 4.7K resistors are connected to the base of the transistors. The address line of the MCP23008 is set to 0x20 if you set it to different address change it in the lcd23008.py file that came bundled with this project.
The speaker will be connected to the audio port of Raspberry Pi computer. The relay's NO connections will go to vibrators (not shown in the circuit)
Avoiding repetition
It's little annoying to hear the same value on and on by Raspberry Pi. Therefore, in the software we have created an array where the last 20 distance values are stored and when the last reading differs by more than a set value (here we made it 2 cm) it will speak up else it will just maintain a peaceful silence ! Change the value of 'sv' at the beginning of the program to suit your requirements.
Testing
Set the volume high if you connect the audio socket with an amplifier else put the earphone into the ear and then run the python program in su mode.
$> sudo python ultra3.py
The first initiation takes little time. You will hear the greeting message by Raspi and then the program falls into the infinite loop and it goes on repeating the distance measurement. The two GPIOs – 25 & 8 are connected with two 5V relays to produce two warnings – one at >200 cm and one at <100 cm. In actual for a blind man these can be connected with two small vibrating motors that are normally found in cell phones.
Finally to put the program at the start insert the following line in the /etc/rc.local.
$> sudo nano /etc/rc.local
# go to the end and before 'exit' add the following line
sudo python /home/pi/ultra4.py &
The program can be cased in a small box.
Software
All have been put in the resource directory. However, they are also available at the following location of my Google drive.
Accuracy of measurement
Ultrasonic ranging module HC - SR04 provides 2cm - 500cm non-contact measurement facility, the ranging accuracy is 0.3 cm and aperture angle is 15 Degree.
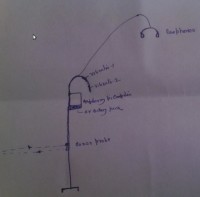
Walking aid
My proposed walking aid is like this. The vibrators can best be placed on two spots – upper and lower so that while holding, the man can distinguish whether it comes from top or from bottom. The other way is put it on two separate handles – left and right. One vibrator will vibrate when there is any object within 100 cm (which is more required ) and the other one is for object away by more than 200 cm (safer way). The raspi will be tied below the handle. The 6Volt lead acid battery or Ni-CD battery pack will be just below it. The sonar probe will be on little below mid way to identify the object at that level. The earphones will give out the sonar readings when there is a change in the reading by the amount decided by the set point (sv). Some earphones have built in volume control else one can be adjusted in the ultra3.py program (by changing the -a220 value to something soothing ; -a200 is full volume ).
Temperature corrections
The speed of sound varies with temperature therefore, the DS18B20 in the schematic may be used to temperature correct the speed of sound at varried temperature and produces a more fine reading.
Sonar work principle
The sonar probe works on 40KHz frequency. In case another man appears with a similar probe infront of this man, both the probes may start malfunctioning. I'm working on this now.
Bye, bye
S. Bera
Vindhyanagar
Discussion (1 commentaire(s))