
Sceptre Software Development [100017]

Grasping the Sceptre. Here now are the explanations and details of the Sceptre software. Let your reign begin!
Grasping the Sceptre - Software library for easy programming
More about toolchains
Before getting into the details of programming the Sceptre, let’s start by reminding ourselves of a few of the basic principles of programming in C. Oh yes, most of the Sceptre is programmed in C — for the time being, at least, as there are plans afoot for a C++ layer. We’re not aiming here to go into detail about C itself, but rather, about the mechanism for converting a program written in C into executable code for the microcontroller. It’s important to understand how all this works so as to be better able to program any microcontroller-based system, including the Sceptre, of course.
This is article is part of a large project published in 2010 & 2011 covering several articles:
- The Sceptre - hardware (main article)
- The Sceptre - software (this article)
- Debugging the Sceptre over JTAG
- The InterSceptre - I/O expansion board
- The Sceptre meets Arduino
- The Sceptre meets Oberon
- Graphic display shield for the Sceptre
First of all, the compiler ‘translates’ (compiles) the source code in C to turn it into source code in assembler language. The compiler can issue warnings and flag up errors. Always take care to resolve any warnings, if you possibly can. Errors are of the ‘typo’ or ‘undefined object’ variety, and must be corrected, or else you won’t be able to go on.
It’s the assembler that converts the source code into assembler language, creating from it what are called ‘objects’. At this point, it’s possible to add other functions written directly in assembler. This will often be the case for a special file commonly named CRT (from C Runtime) or Startup, which contains the very low level system initialization. In this file, the interrupt and reset vectors and stack are initialized, along with the memory and the pre-initialized variables. It’s also from this file that we call the main function of a program in C.
The linker incorporates all the objects produced by the assembler into the executable. It also adds the objects archived in libraries that the application is going to need. The libraries contain functions that don’t change very often, like printf, but which can be re-used over and over again. If this tool fails to find certain objects, it will return ‘unresolved external’-style errors.
The linker requires a map of the memory in order to organize the objects and create links between them. With the help of this map (or table), it determines the function addresses and writes them into the various calls and jumps in the program. That’s why it’s called a ‘linker’.
It’s up to the user to provide this memory map (also called a ‘linker script’), since it depends of course on the hardware.
The end product of the linker is an executable file that can be programmed into the microcontroller.
What we’ve just been describing is the ‘compilation chain’. The article on the Sceptre hardware explained that we’ve opted for WinARM as our compilation chain. You can refer back to that article for details on installing WinARM. Apart from the functions for controlling the board, the Sceptre’s software distribution contains the elements needed for the compilation chain, such as a Startup file and a memory table (.LD file).
The compilation chain is launched using the make command, a very powerful program (included in WinARM, of course); make runs a script usually named makefile. A makefile contains all the commands and options for producing an executable from the source files and libraries. Make is so powerful that a makefile can be extremely complex and incomprehensible. So the best thing to do it to take a makefile that works and adapt it to your own project. Naturally, the Sceptre distribution also contains a makefile.
The Sceptre library
Since the Sceptre offers a certain number of on-board peripherals, it’s only logical to bring all their drivers together into one library to make them easier to use and save a little compiling time, since they don’t have to be re-compiled every time. At the time of writing, the library already contains the drivers for the USB, the SD memory card reader, the Bluetooth module, the UARTs, the counters, the real-time clock (RTC), the thermometer, and the accelerometer. Certain functions for initializing the micro are also included in the library, along with part of the newlib interface (see below). Not surprisingly, the library is called sceptre (.a). In order to use it, you need to include the file sceptre.h in your project and tell the linker where it can find the library.
The Sceptre library offers functions that make it easier to use a peripheral. For example, to set up a Bluetooth connection, all you have to do is call the bluetooth_connect function after the module has been initialized. To read the accelerometer, there is the accelerometer_read function, while thermometer_read lets you read the thermometer. It’s easy, too, to turn the Sceptre into a USB key thanks to usb_mass_storage_init and usb_mass_storage_tick. Files on the SD card are manipulated using f_open, f_close, f_read and f_write (similar to fopen, fclose, fread and fwrite in libc) and to write to serial port 0, there is printf. You see, a lot of the work has already been done — and it’s not finished yet! Take a look at the documentation in the doc\html folder, starting from the index.html file.
You can extend, modify, and correct the library, as you have access to everything. Each time you modify something in this library, you’ll need to re-compile it. This can be done at a command-line prompt by running the make command in the distribution’s core directory (perform a ‘clean’ first so as to be sure you are starting out from zero):
C:\sceptre\core>make clean
C:\sceptre\core>make
For ARM7 experts, here’s an interesting bit of information: the library can be compiled in ARM mode or in thumb interworks (iw) mode. In ARM mode, the Sceptre is a true 32-bit system, but the executables are larger. In thumb-iw mode, the executables are smaller, but also slower, as the processor works in a 16-bit-compatible mode. With 512 kB of program memory, there’s plenty of room to store a program in ARM mode, but programming the microcontroller will take longer. By default, the library is compiled in ARM mode; to compile it in thumb-iw mode, use:
C:\sceptre\core>make clean
C:\sceptre\core>make ARM_MODE=thumb
That way, you’ll get the sceptre-iw.a library.
Always check that the application and the library are using the same mode!
The Sceptre library includes other libraries found on the Internet, in particular lpcusb and fatfs. The former provides the USB driver, the latter is a FAT file system making it possible to read and write Windows, Linux, or MAC-compatible SD cards. When you compile the Sceptre library, you may see a number of warnings during compilation of files from the external libraries. Ignore them, there’s nothing terribly serious, these libraries work perfectly. Given that these libraries are maintained independently of Sceptre, we avoid modifying them.
Getting stuck in...
The Sceptre distribution contains a test application named app_preload. This program is pre-loaded on the Sceptre boards available from our shop and lets you check easily that the whole board is working properly. To use it, you need to connect the Sceptre’s USB port (JP4 and JP5 on pins 1 and 2) to a computer with the FTDI drivers installed. Run an RS‑232 terminal program on the computer — for example, Flash Magic, Tera Term or RealTerm — and configure the correct serial port for a speed of 115,200 baud, eight data bits, no parity, and one stop bit. Disable the hardware flow control Press the board’s Reset button. Now you should see a screen similar to this one.
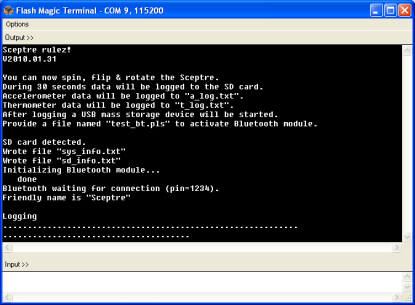
After a few seconds, the application attempts to open an SD card to write a few little files with information about the system to it, then, for 30 seconds or so, it saves in two other files the data read from the thermometer and accelerometer (wave the board about a bit!) By writing a file named test_bt.pls to the SD card, containing a name in ASCII (16 characters max., with no spaces or ‘_’, you request the Bluetooth test and the module starts up. Lastly, the Sceptre becomes a ‘USB key’ that also sends the thermometer and accelerometer data to serial port 0. It is now possible to hot-connect the Sceptre’s USB pin header so as to access the ‘USB key’: remove JP5, then JP4, refit JP4 on pins 2 and 3, and finish by fitting JP5 on pins 2 and 3. It’s also possible to change the USB key mode into serial port mode, but nine times out of ten, this will entail re-booting the board.
If you connect an LED with its anode to pin 1 of K7 and its cathode to GND via a 330 Ω (or so) resistor, it will flash at a frequency of 1 Hz.
With the Bluetooth module enabled, it ought to be possible to connect to a computer and send data. The Sceptre sends everything it receives on UART0 to the Bluetooth module and vice-versa.
The test application is compiled via a command-line prompt in the app_preload directory:
C:\sceptre\app_preload>make clean
C:\sceptre\app_preload>make
The test application’s makefile compiles the application and if necessary the Sceptre library too.
If everything works properly, make will end without any errors and creates a preload.hex file. This is the file you’ll have to program into the microcontroller, using for example lpc21isp (included in WinARM) or Flash Magic (see here). The latter detects automatically if the HEX file it’s supposed to use has been modified (what’s more, it displays the date and time the file was last saved), so all you have to do is click on the Start button to begin the flashing. The flashing will take longer or less time, depending on the file size. Unless you’re keeping an eye on the programming, you may not spot the Flash Magic success message, as it goes off about 30 seconds after the end of flashing.
Flashing the microcontroller using lpc21isp is done using the command (if you’re using COM4):
lpc21isp -control preload.hex com4 38400 12000
The "-control" option indicates that it’s lpc21isp that puts the board into programming mode and will restart it once programming is over.
Two indicators alongside the USB socket show if a data transfer has in fact taken place.
We recommend taking the test application as a starting point for your own project. Thanks to its makefile, you don’t need to compile the library separately. Create a directory for your project alongside the app_preload directory so as to ensure that all the paths remain correct. Consult the main.c file to find out how to use the Sceptre library.
You can use any text editor to write a program, just so long as the source code doesn’t contain any formatting codes or page formatting (nothing but ASCII, in other words!) The Programmer’s Notepad (PN) editor supplied with WinARM is a good choice (see below).
Add your C files into your project’s makefile (not into the library one!) below the line ‘SRC = main.c’, like this (note the ‘+=’!):
SRC = main.c
SRC += my_file.c
…
You can add as many files as you like. To change the name of your executable, modify the line:
TARGET = preload
by entering the name you want.
The latest version of Sceptre library can be found at the Sceptre starting page.
More on Programmer’s Notepad 2
The WinARM distribution also includes Programmer’s Notepad 2, a special text editor for programmers. This tool can be found in the WinARM\pn directory and is initially configured for WinARM. There is now a more recent version [7]. All you need do to install this version is to delete everything in the WinARM\pn directory except for the tools sub-directory containing the macros for WinARM. Next, download the Portable Edition and unzip it into the WinARM\pn directory.
Use the command Tools-> [WinARM_C] make all – CTRL-F7 to compile your program.
PN picks up the messages issued by the tools called by make and displays them in the Output window. Do look at the messages carefully, as there may be warnings or errors to be corrected. Sometimes a tool stops because of an error that’s nothing to do with your program, but which indicates a Windows problem (noticed in particular with Windows Vista). If this happens to you, it’s better to call make manually from the command line prompt.
More on libc, newlib, syscalls, and BSP
GNU C includes the libc library containing a very large number of functions that make programming in C+ easier. Certain of these functions depend on the hardware, particularly the functions that manipulate files and data streams. Normally, it’s the operating system (OS) that makes the link between the hardware and libc, but where the OS doesn’t do it, it’s up to you the user to do it yourself (only if you want to make use of these functions, of course). This is why a version of libc for embedded systems has been introduced, with the name of newlib. This new library offers an interface named syscalls which lets you graft a board support package (BSP) onto the library in order to adapt it to the hardware. If now you are only using standard C functions in your application, all you have to do is modify the BSP to make it all work on another platform.
For the Sceptre, we’ve incorporated some of the syscalls in order to allow use of printf, fopen, etc. Among others, printf is a very handy function for debugging and lets you send character strings to Sceptre’s serial port 0.
Documenting using Doxygen
It’s important to document software, but this is not always easy and one soon forgets to update the documentation following a modification. Tools exist that let you automatically extract the comments (REMs) from a piece of software so they can be presented in a usable form. Doxygen is one of these tools, and by no means the least. What’s more, Doxygen is free and open-source, and so ideally suited for our project.
To make the most of Doxygen’s capacities, you need to respect certain layout rules for source files. Like any self-respecting software, Doxygen offers a plethora of options that you’ll probably never use, but already with just a handful of commands, it’s possible to do some good things. So remember to format your comments like this:
/**
* @file
* Description of file.
*/
A Doxygen comment starts with /** and ends with */ — the other asterisks are optional. It’s also possible to enter a Doxygen comment on a single line using ///.
An “@file” block is obligatory, in order for Doxygen to take account of the file. Use the block below for commenting on a function.
/**
* Short function description.
*
* @param <parameter name> <parameter description>
* @return <description of value returned>
*/
Doxygen extracts all these blocks of comments and creates from them a collection of HTML pages (among others) with the links to the definitions, sources, types, etc. — it’s very impressive. Take a look, for example, at the Sceptre documentation included in the distribution.
And here’s another very handy Doxygen command: @todo
Doxygen creates a special page with each todo found. With a function like that, you’ll never forget anything again!
More on sysint.h
In the world of microcontrollers, it’s very important to use variable types that correspond to the hardware. The size of the types depends on the hardware, and the fact that a character uses eight bits on platform A by no means implies that it will use as many on platform B. So to avoid such difficulties, you define clear types like uint8_t (unsigned 8-bit integer) or int32_t (signed 32-bit integer). Unfortunately, everyone does this a bit after their own fashion, and the result, when you glean your code a bit from everywhere, is that you often find yourself with several definitions of the same type (and not necessarily identical) like BYTE, BOOL, or DWORD, which the compiler doesn’t like one bit. So we strongly recommend you to only use the types defined in sysint.h, supplied with the GNU tools. This file contains type definitions specially designed for programming microcontrollers. Do this, and everyone will be grateful to you for it.
Discussion (0 commentaire(s))