There are many temperature-related effects that can be used to measure temperature. The chirping sound produced by a cricket is one of them.
In electronics temperature can be measured with for instance a thermistor. Another way is to use a Resistance Temperature Detector or RTD. Then there is the thermocouple, but semiconductor-based sensors are often used also. There are many more temperature related effects in nature that can be used for measuring the temperature. Surprisingly, the chirping sound produced by a cricket is such an effect.
Counting Chirps
Similar to estimating the distance of a thunderstorm by counting the time between a lightning flash and the thunder that follows it, the temperature of the air can be estimated by counting the number of chirps produced by a cricket in one minute and doing a simple calculation.
Thermometer Cricket
This correlation was reported already in 1881 by a certain Margarette W. Brooks, but the credit went to Amos Dolbear after he published an article in 1897 entitled "The Cricket as a Thermometer". The green tree cricket officially known as Oecanthus fultoni has been known as the thermometer cricket ever since. It is said to be fairly accurate between 5 and 30 degrees Celsius.
Easy Calculations
Using the cricket chirp rate to determine the air temperature in degrees Fahrenheit is easy. Just count chirps for fifteen seconds and then add 40 to the count. This is known as Dolbear’s Law.
To get the temperature in degrees Celsius count the number of chirps for eight seconds and add five to it.
T = N8 + 5 °C
Example: N8 = 11 -> T = 11 + 5 = 16 °C (= 60.8 °F)
The Celsius method is less precise as it was converted and rounded from the Fahrenheit method but also because the counting period is much shorter. For better precision count chirps for one minute.
The Other Way Around
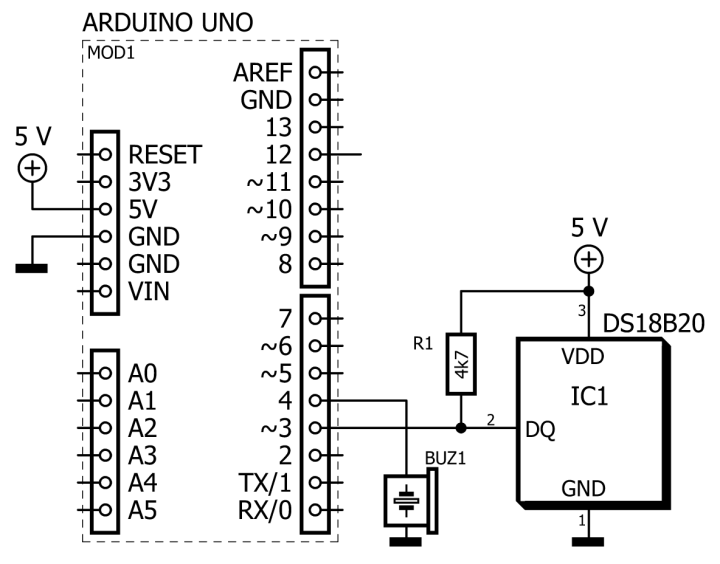
Once we know all this, we can invert the process and emulate a cricket based on the ambient temperature. We can use this Arduino-based circuit. The parts needed to do this project can be found in the Arduino Sensor Kit available from the Elektor Shop.
Connect a DS18B20 one-wire temperature sensor (module) together with a buzzer (module) to an Arduino Uno board. If you use a DS18B20 IC then don’t forget to connect a 4.7-kΩ pull-up resistor between the sensor’s middle pin and +5 V. The DS18B20 module in the sensor kit has such a resistor preinstalled.
Writing the Sketch
Once the circuit is ready, we can write the software for it. First, we need some libraries. If you don’t have them already, use the Arduino IDE’s library manager to install the OneWire and DS18B20 libraries.
Obtaining temperature data form the sensor is now easy: declare a DS18B20 object and call its getTempC member function repeatedly. Convert the temperature to a period in milliseconds using the equations given above (plus some extra math):
float tc = ds.getTempC(); // Get temperature in Celsius.
float tf = 1.8*tc + 32; // Convert Celsius to Fahrenheit.
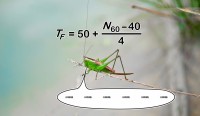
float N60 = 4.0*tf - 160; // Calculate chirp rate in counts per minute.
float period = 60000.0/N60; // Convert chirp rate to ms.
Fahrenheit is Better Than Celsius
The temperature is read in degrees Celsius before being converted to degrees Fahrenheit, because that is what Amos Dolbear came up with and what we will consider to be most accurate. The Celsius equation approximates Amos Dolbear’s approximation. The DS18B20 library features a getTempF function, which does the same thing as we did here. However, the value in degrees Celsius is lost when you use that function. Reading in Celsius and converting to Fahrenheit is therefore slightly quicker.
Cricket Sound
For the cricket sound we can use the Arduino library function tone. According to the internet somewhere around 5 kHz would be a good cricket chirp frequency. Of course, with the function tone we won’t get a chirp but a beep, but that will be good enough for this application.
The chirp rate of the cricket emulator is limited mainly by the 1-Wire interface of the DS18B20. By using a faster temperature sensor, much higher chirp rates are possible.
Silly Project or Not?
Now this looks like a silly project and, to be honest, that is how it started. However, once I had it up and running, I quickly noticed how sensitive the human ear is to rate changes. In the end I think this emulator could make for a useful temperature indicator in applications where it is not practical to keep an eye on a display.
Veuillez saisir votre adresse électronique. Les instructions de réinitialisation de votre mot de passe vous seront immédiatement envoyées par courriel.
Elektor Magazine est depuis 65 ans l’une des principales sources d’information en électronique pour les ingénieurs, les concepteurs, les start-ups et les entreprises. Notre magazine est soutenu par une communauté active d’ingénieurs en électronique – des étudiants aux professionnels – passionnés par la conception et le partage d’idées innovantes.
Pour eux, nous publions chaque année des centaines de contenus sous différents formats, tels que des articles, des vidéos, des webinaires et d’autres formats d’apprentissage. Notre mission est de partager les connaissances de toutes les manières possibles et d’inspirer les lecteurs avec les dernières évolutions du secteur de l’ingénierie électrique.
Thank you for your vote!
Ajoutez vos commentaires
Thank you for your vote!
Veuillez vous connecter pour ajouter une note ou fermez pour revenir en arrière

Discussion (2 commentaire(s))