
Time lapse timed photography on MaixCam
it’s blooming flowers, melting ice, or rising buildings, MaixCam lets you automate image capture over days or months — no external controller needed. With its built-in touchscreen, clock, and Python programmability, this compact Linux-powered camera is ideal for long-term, unattended operation. A perfect DIY solution for Elektor Lab readers exploring creative and technical photography and the cost is unbelievable!
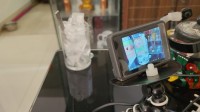
Time lapse timed photography on MaixCam board
Introduction: Everything changes with time. Some changes happen so rapidly — like 7 frames or more per second — that we perceive them as motion picture or a movie. Others are much slower, almost imperceptible to the naked eye. But if we have the patience to observe them carefully, we can witness these transformations unfold in a beautiful and captivating way.
Ice melts. Flowers bloom. Buildings rise — slowly, day by day. With time-lapse photography, even these gradual events can be captured and visualised as stunning sequences of changes. Although these processes span hours, days, or even months, our camera only needs to capture a frame every few seconds, minutes, or even hours. Over the course of a month, that may amount to just a few thousand or lakhs of images.
By arranging these snapshots along a timeline and converting them into a video, we compress time into a watchable form — revealing the hidden beauty of transformation. And that, precisely, is the magic of time-lapse photography.
Advantage with MaixCam : To achieve time-lapse photography, we need a camera that not only captures images but also includes a built-in clock and a programmable shutter mechanism — allowing it to operate unattended for long durations. Most conventional cameras may support interval shooting, but they typically lack the capability to run autonomously for days or months without external control.
MaixCam overcomes these limitations. It integrates a camera with a touch screen and a powerful microprocessor that runs a lightweight Linux operating system. It supports Python programming, enabling complete automation of the time-lapse imagery process.
Working principle & data-in of this project: Harnessing the power of MaixCam’s processor, we’ve developed a time-lapse photography system where users can control Max_time - how long the session runs and lapse_time - Photography interval by pressing the touch_button on the TFT screen as shown. If not changed it will be operating on the default value [Green selected]. These buttons will not be shown on the captured image. The code will automatically terminate at the expiry of the Max_time. Some additional information is provided at bottom of the screen - Lap time, Max time, time left and number of snaps taken. In the actual image these buttons will not be there!
Caution note: Since this is a long-duration program, it is recommended to run it directly from the MaixCam TFT screen menu. Running it via SSH or MaixVision may lead to unexpected termination if the connected computer enters sleep mode. For maximum reliability, the best approach is to add the script to MaixCam’s normal menu or autostart menu, ensuring the program runs automatically on boot—without relying on network connections or the client computer’s active state.
Typical use of this project but not the least:
1. Plant growth & monitoring: Shrinking time duration between events like plant growth & blooming for botanist to understand plant life cycle.
2. Construction site monitoring: Documenting progress of building projects over days, weeks & months which results in a compressed visual summary for stakeholders & project review.
3. Landscape & weather changes: Record shifting of skies, sunrises, sunsets, cloud formations or storms thus producing stunning visuals & helping meteorologists to analyse patterns.
4. Traffic & Crowd flow analysis: Track vehicles or pedestrian movements in urban setting or during festive or special events to assist in urban planning, traffic control and event management.
5. Industrial process documentation: Monitor automated machinery, production lines or testing processes for trouble shooting, Quality audits and training materials.
6. Wildlife census / observations: Record animal behaviours in natural habitat without human presence thus helping biologists to study overtime or count the census.
7. Environmental and climate studies: Track glacier retreat, deforestation, river flow or pollution spread providing a visual proof for research, education and advocacy.
Hardware: Sipeed Chinese micro controller has the following specifications - Dual core: CPU Big Core: 1GHz RISC-V C906 / ARM A53, CPU Small core: 700 MHz RISC-V C906 / ARM A53, NPU: 1TOPS@INT8 [1 TOPS = 1 Trillion (10¹²) operations per second], 256MB DDR3 RAM, TFT touch screen, SDCard, Microphone for sound in, 5M Camera and WiFi is just good enough to run this code besides it’s priced at a very attractive rate - robu.in [INR:7K], aliexpress.com [USD $50], alibaba.com, amazon.in [INR:12K]
Operating System: The MaixCam runs a lightweight, tailor-made Linux-based operating system designed specifically for Kendryte K210 boards. Key features include: Integrated support for YOLOv5 to YOLOv8, Headless mode for efficient remote operations, Python 3.11 for scripting and automation, SSH Daemon for secure remote access. This setup is ideal for real-time machine learning codes, making it a great choice for entry-level AI projects or lightweight edge AI systems.
Hardware Setup: This board Sipeed MaixCam is a compact AI-focused microcontroller originating from China. Detailed information about the board is available on the official Sipeed Wiki site [https://wiki.sipeed.com/hardware/zh/maixcam/index.html ]. Although the website is primarily in Chinese, modern translation tools like Google Translator can help you navigate and understand its content effectively.
Tripod for MaixCam: MaixCam series is designed for edge AI applications. Its compact size, efficient power usage, and integrated GPIO support makes it an excellent choice for this project. There is no standard tripod available for MaixCam here in India. A makeshift arrangement can be fabricated using two small neodymium magnets [amazon.in], a Raspberry Pi camera tripod [robu.in] and some brain storms with a coke can bottle can develop this tripod which is very stable & pan-able. However, the International viewers can search alibaba.com or aliexpress.com where such tripods are available along with the purchase of the MaixCam board.
Connecting & setting Up the Maixcam: To get started, download the latest MaixCam operating system from the release page [https://github.com/sipeed/MaixPy/releases]. However, in most cases, the board you purchased will already have an operating system installed. If so, you only need to connect the board to your computer. There are three main ways to connect the board to your computer: (1) USB direct connection, (2) Though SSH and (3) Using Maixvision IDE [https://wiki.sipeed.com/maixvision ] for a more visual & integrated experiences.
For uploading the OS - Either you open the board back cover, remove the SDCard, upload the OS and then reinsert the SDCard back or do it without opening the back cover by pressing the user button and then inserting the USB cord into the computer. You may have to press the ‘user’ button few more times until the MaixCam appears as a USB drive labeled ‘boot’ in your “My Computer” page. Use “balenaEtcher” [ https://www.balena.io/etcher/ or https://github.com/balena-io/etcher] or any similar software to transfer the OS image to the MaixCam drive.
Once the OS is transferred, now remove the USB plug & power it again and the MaixCam will display the opening page on the TFT. Using your finger, press the ‘Settings”, find “WiFi” connections, Scan the network and connect it using the password. After connecting to WiFi, the MaixCam may prompt you to download the ‘MaixPy runtime’. Follow the on-screen instructions to complete this step and then play with the other icons on the TFT to understand the board better.
MaixVision IDE and SSH Setup: On the left side of the screen, you’ll find the MaixVision IDE. On the right side, you can access the MaixCam via SSH. From MaixVision, you can either use SSH or GFTP (Graphical FTP) to interact with the board. Alternatively, you can SSH directly from the command prompt of your computer using: ssh root@192.168.82.112 [get the IP address from your router] when it asks for password it will be ‘root’. Many sample projects are available at https://maixhub.com/app/ However, note that many of the projects are in Chinese, and the help files are often lacking. [A note of caution -> in case some code is already running on MaixCam and you connect or disconnect using MaixVision IDE, the code will stop playing. A safer way to connect the MaixCam without disturbing the running code is -> ssh root@192.168.82.112 that way nothing will be disturbed.]
For Uploading:After doing the ssh into the board [ssh root@192.168.82.112, password “root”] you can scp to upload the files to the board.
$> scp time_lapse_timed_photography.py root@192.168.82.112:/root/time_lapse_timed_photography.py
However, the best way to do this is to install MaixVision IDE onto your computer and then do it inside the MaixVision. On the left side bottom you will find connect button to connect the board to the same network for MaixVision to work. On the top right side of MaixVision IDE, you will find “Device file manager”, select the drive where you want to upload / download / rename / delete / move and then press the button. One note of caution, never try to upload anything into the “/boot” directory of the device, it may spoil the operating system and you end up transferring the image file again.
Running the code from MaixVision IDE is pretty simple. Just get the MaixCam connected to your WiFi. Connect the MaixCam by pressing the connect icon on the bottom left and then press the play button on the bottom left side. The code will start playing out now!
Boot start: This is something different from other Sipeed boards. Here you have to do it this way - Go to left side bottom of MaixVision IDE, Find the ‘Package’ button and provide all the data like - id, name, version, developer, description, project_icon etc. Then submit and finally install it & complete it. You may select a matching icon for the project to be identified in MaixCam.
This will create a ink in the /maixapp/apps/app.info file with the project name and a folder named ‘time_lapse_timed_photography’ inside /maixapp/apps/ which will have 3 files one of them being main.py [which is nothing but your python code file ]
Now in the /maixapp/auto_start.txt file just enter your code - time_lapse_timed_photography & save the file [For this you have to download the file, edit it and then upload the file]. This file should not have any other entry. Disconnect your MaixCam board, your code will autostart. For doing this graphically after doing ‘install’ you can do this thing from the touch screen menu of MaixCam by - Settings -> Start-menu->time_lapse_timed_photography. Now restart the board and time_lapse_timed_photography will be auto start.
Running from MaixCam menu: Once you have converted the code into Package [Package - Submit - Install - Complete ] the code resides in the /maixapp/apps/time_lapse001/main.py folder. To run the code from MaixCam menu just run the device, on the TFT screen go to the bottom of the TFT screen [pull the screen up] you will find the icon of your project_package. Press it and the code will start playing!
Converting to Video file:
Well now only one task left to convert the time-sequenced of *.jpg files to a video file. For that at the end of the code execution press the clock on the bottom of the middle window [as shown with green pen] This will open the ssh window. Watch the last three commands in the history-file. This will take you to the /snapshot directory where all the time-sequenced *.jpg files are there. Next command [no 259] “ffmpeg -framerate 10 -pattern_type glob -i 'snapshot_*.jpg' -c:v mjpeg timelapse.avi “ will create the Timelapse video file of our interest. Download this file to your local computer and watch. The ffmpeg of MaixCam cannot directly convert to *.mp4 file which is a more compact video file. The *.avi file is good enough to observe the Timelapse moments. However, if you want to convert it to *.mp4 file, use this command in your local computer to convert it to *.mp4 -
$> ffmpeg -i timelapse.avi -vcodec libx264 -crf 23 timelapse.mp4
Finally delete the jpg files from /snapshot directory as they are no longer required by command [no 260] - rm *.jpg
Attachment: time_lapse_timed_touch.py, documents & pictures are included in zip file.
Aftermath: Time-lapse photography is the domain of expert photography. Nonetheless, the improved silicon technology, the powerful microcomputer, and improved coding have made it possible to try, experiment, and enjoy at the amateur level as well! This project opens up an exciting gateway for electronics enthusiasts to blend art with technology. With simple hardware and open-source platforms, even beginners can capture stunning visual narratives of nature, construction, or daily life. It not only fosters creativity but also builds hands-on skills in automation, embedded systems, and image processing. One endeavour still left is to find a way to switch off the backlight or dim the display during the session to preserve battery life for longer operation.
Prototype: [se
Bye bye
S Bera
Discussion (0 commentaire(s))