
OBD II head-up display
Do you also want a head-up display for your car like in the luxury class? no problem
In the accessories trade there are already some retrofit solutions that receive the data via OBD 2. What they all have in common is that they are completely useless. Everyone depends on a transparent reflective film being stuck to the windshield. This is to be assessed critically, because basically nothing should be glued to the windshield - especially not in the field of vision, i.e. the area that is swept over by the windshield wipers. Outside of this range, however, the display no longer makes sense. Even with a reflective disk, the display in the light is almost always unsatisfactory and barely legible. Some displays are also completely overloaded with functions and displays. More than one value is confusing and very distracting - the display is no substitute for the instrument cluster.Warning messages at certain speeds are nonsensical if they are not adapted to the current road.
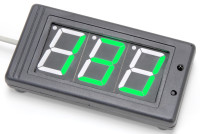
The kit presented here only shows the speed (optionally in km/h or mi/h). The display is extremely bright and can be read without an additional film on the windshield. The brightness is adapted to the ambient brightness so that it does not dazzle in the dark. Due to the structure of the front panes, there is a double reflection, but this is hardly a problem. The display supports the two OBD-2 protocols ISO 9141 and ISO 14230), which are recognized automatically. On the PCB are also the parts mounted they will be needed for additional CAN protocol - but not supported by the attached free firmware. The display switches off automatically when the engine is switched off and recognizes the engine start based on the brief on-board voltage.
The display can be operated on 12 V (vehicles) and, with restrictions, on 24 V (commercial vehicles). At 24 V, R1 should be swapped for 1 kΩ.
After the plug is plugged into the OBD socket of the vehicle, the HuD tries to connect to the control unit in the vehicle. This only works if the ignition is switched on. Later, the display will automatically recognize when the ignition is switched on or the engine starts.
First the version number of the firmware is displayed for one second.
Then "°C" or "°F" appears for 1.5 seconds. "°C means that the measured values (the speed) are displayed as a metric value (km/h)." °F "indicates the Anglo-American system of measurement (mi/h).
The HuD then tries to establish an OBD II diagnostic connection and tries out the supported protocols. The left decimal point lights up in the time. If the point disappears and there is no further display, no connection could be established. If a protocol was found and the connection established, the code number for the protocol is shown for 1.5 seconds:
As soon as the ignition is switched off, the HuD detects this and switches to standby mode and the display is switched off.
When the engine is restarted, the HuD begins to attempt to re-establish the connection and, if successful, then displays the speed again.
To change the system of measurement (metric or Anglo-American) you have to pull out the diagnostic connector briefly and hold down the button when you plug it in again. This changes the system of measurement. As soon as "°C" or "°F" is displayed (the new system of measurement), you can release the key.
During operation, the display brightness automatically adapts to the ambient brightness via the photodiode. You can change the range of the brightness change at any time while the speed is displayed: Press the button until "Lo" (low) appears in the display. Release the button briefly. Press and hold the button. As long as you hold down the button, the brightness levels from 0 (maximum brightness) to 10 (minimum) are run through. As soon as the desired minimum ("Lo") brightness level (i.e. the brightness that should be used when it is dark) is displayed, release the button. Then "Hi" (high) appears. Press the button again and hold it down to run through the brightness levels. Release the button when the desired maximum brightness (used in direct sunlight) is displayed. The high value must be smaller (lighter) than the low value. Otherwise the setting will be ignored. The two values are automatically saved and used from then on. The greater the difference between low and high, the more gradations of display brightness there are. If you do not want adaptation, select the same value for both settings.Select the same value for both settings.Select the same value for both settings.
This case fits if you cut off the display area: Z34A KRADEX
Attached the PCB file in Eagle format and the firmware as HEX-file for the Atmel
You can find some more info in German language on my webpage
The kit presented here only shows the speed (optionally in km/h or mi/h). The display is extremely bright and can be read without an additional film on the windshield. The brightness is adapted to the ambient brightness so that it does not dazzle in the dark. Due to the structure of the front panes, there is a double reflection, but this is hardly a problem. The display supports the two OBD-2 protocols ISO 9141 and ISO 14230), which are recognized automatically. On the PCB are also the parts mounted they will be needed for additional CAN protocol - but not supported by the attached free firmware. The display switches off automatically when the engine is switched off and recognizes the engine start based on the brief on-board voltage.
The display can be operated on 12 V (vehicles) and, with restrictions, on 24 V (commercial vehicles). At 24 V, R1 should be swapped for 1 kΩ.
After the plug is plugged into the OBD socket of the vehicle, the HuD tries to connect to the control unit in the vehicle. This only works if the ignition is switched on. Later, the display will automatically recognize when the ignition is switched on or the engine starts.
First the version number of the firmware is displayed for one second.
Then "°C" or "°F" appears for 1.5 seconds. "°C means that the measured values (the speed) are displayed as a metric value (km/h)." °F "indicates the Anglo-American system of measurement (mi/h).
The HuD then tries to establish an OBD II diagnostic connection and tries out the supported protocols. The left decimal point lights up in the time. If the point disappears and there is no further display, no connection could be established. If a protocol was found and the connection established, the code number for the protocol is shown for 1.5 seconds:
- 1 = ISO 9141 10400
- 2 = ISO 9141 9600
- 3 = ISO 14230 slow init
- 4 = ISO 14230 fast init
As soon as the ignition is switched off, the HuD detects this and switches to standby mode and the display is switched off.
When the engine is restarted, the HuD begins to attempt to re-establish the connection and, if successful, then displays the speed again.
To change the system of measurement (metric or Anglo-American) you have to pull out the diagnostic connector briefly and hold down the button when you plug it in again. This changes the system of measurement. As soon as "°C" or "°F" is displayed (the new system of measurement), you can release the key.
During operation, the display brightness automatically adapts to the ambient brightness via the photodiode. You can change the range of the brightness change at any time while the speed is displayed: Press the button until "Lo" (low) appears in the display. Release the button briefly. Press and hold the button. As long as you hold down the button, the brightness levels from 0 (maximum brightness) to 10 (minimum) are run through. As soon as the desired minimum ("Lo") brightness level (i.e. the brightness that should be used when it is dark) is displayed, release the button. Then "Hi" (high) appears. Press the button again and hold it down to run through the brightness levels. Release the button when the desired maximum brightness (used in direct sunlight) is displayed. The high value must be smaller (lighter) than the low value. Otherwise the setting will be ignored. The two values are automatically saved and used from then on. The greater the difference between low and high, the more gradations of display brightness there are. If you do not want adaptation, select the same value for both settings.Select the same value for both settings.Select the same value for both settings.
This case fits if you cut off the display area: Z34A KRADEX
Attached the PCB file in Eagle format and the firmware as HEX-file for the Atmel
You can find some more info in German language on my webpage
Discussion (4 commentaire(s))