
Door opener for musical talents
Forgot your front door key again? With this door opener, all you need in the future is some musical talent to get into your apartment. You'll be surprised how it works...
What it's about
The principle of this circuit is quickly explained: A tone sequence in C major comprising up to 5 notes must be played correctly and the door lock opens as if by magic. It doesn't matter in which vocal range the tone sequence is generated - the melody is recognized over 4 octaves in the frequency range between 131 Hz and 1976 Hz. So it also works for your wife and your children with their different voices. And you can also whistle, use a flute or another instrument.
The hardware
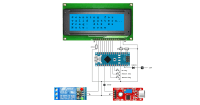
- The heart of the circuit is an Arduino Nano
- LCD module TC1604A-05
- IDUINO module ST1146 for recording the sounds
- JOY-IT relay COM-KY019RM to activate the electric door opener
- For control and configuration, 3 buttons in green, white and red are required
- Capacitor 100 nF
- Resistance 470 Ohm
- Resistance 10K Ohm
- Trimmer 1K Ohm
- Diode 1N4001
There is an important point to consider when it comes to the power supply. Tests have shown that the USB port of a notebook provides a fairly clean 5 volt voltage and is well suited for the operation of the device. If the device is operated with a standard USB charger, the poorly smoothed DC voltage causes various interference frequencies, so that safe operation is not guaranteed. Therefore, I highly recommend using a good quality separate power supply.
The software
The low frequency signal is fed to one of the Arduino's analog inputs. The first step was to determine the frequency of this input signal. The proven Fast Fourier Transform method, or FFT method for short, is used here. You don't have to worry about the laborious process of creating the required functions, as the arduinoFFT library already has them. What required some experimentation was to find out which window function was best suited for frequency measurement. The Hamming and Hann window functions came into question, both of which have a sine shape. Both lead to a broad peak value and low secondary oscillations. The Hann window approaches zero at both ends, eliminating discontinuities. With the Hamming window, zero is not quite reached, so the signal can show slight discontinuities. Because of this difference, the Hamming window deletes the next side lobe better, but deletes all the others worse. Ultimately, numerous tests have shown that the Hann method is the most suitable variant for my application.
Since the upper limit of the frequency to be measured is 1976 Hz, this results in a sample rate of 4096 Hz, which results in a theoretical upper measured value of 2048 Hz. In order to achieve good accuracy with the determined frequency, I experimentally determined a correction factor, which is included in the calculation.
Next, it was necessary to create an intuitive menu structure to operate the device. After various designs I found a solution which you can see by viewing image FlowDiagram.png.
The start screen is located in permanent scan mode and shows the current frequency and, if available, the associated C major note. In order to achieve the highest possible hit rate, each grade up to a frequency deviation of +/- 9 Hz is recognized as valid. If the first tone of a stored sequence is recognized correctly, the program switches into the sequence validation mode and checks the complete sequence. Each tone should be kept at least 2 seconds before the next tone is reproduced. If the sequence test was successful, an appealing message is made, the relay is activated via an Arduino output port and the door opener releases the lock for about 3 seconds. If the sequence test was invalid, a corresponding note is reported and after about 3 seconds the start screen is displayed again.
To set the note sequence, the red Record button is pressed. A dialog appears in which a note can be selected using the white Select button. The selection is confirmed using the green OK button. A dialog follows asking whether another note should be added. Y or N can be selected using the Select button and the following dialog can be called up using the OK button. After 5 notes the maximum sequence size is reached and the start screen appears again. If you no longer remember the saved sequence, you can display it by pressing the OK button.
Since the saved note sequence should still be available after a power interruption, it is stored in the EEPROM.
Setup and start-up
The assignment of the connection pins of the Arduino Nano is chosen so that there is a 1:1 wiring with the LCD module. Since there are only a few components, I didn't use a circuit board and worked with flying wiring. The trimmer of the microphone module is adjusted so that only one LED lights up.
If you have a good singing voice, you can now try the C major scale. If a note is recognized, it will be displayed with the associated frequency. Of course, it is also possible to use a sound generator and save the corresponding sequence, for example on your smartphone, so that you can play it back later. However, playback depends very much on the volume of the smartphone used and the quality of the speaker. Sung directly, the volume was not a problem and the note recognition works very reliably.
Another note about the LCD module used: instead of the TC1604A-05 module, another variant can also be used, but you may then have to adapt the following line in the program code accordingly, if the columns count differs:
lcd.begin(16, 4); // Initialize LCD display with 16 columns and 4 rows
BTW
The device is also very suitable as a good mood booster at a party. Everyone tries to be a singer to crack the cursed acoustic lock. If it is successful, a siren sounds, for example.
Video
To demonstrate how this circuit works, I produced a short video:
The principle of this circuit is quickly explained: A tone sequence in C major comprising up to 5 notes must be played correctly and the door lock opens as if by magic. It doesn't matter in which vocal range the tone sequence is generated - the melody is recognized over 4 octaves in the frequency range between 131 Hz and 1976 Hz. So it also works for your wife and your children with their different voices. And you can also whistle, use a flute or another instrument.
The hardware
- The heart of the circuit is an Arduino Nano
- LCD module TC1604A-05
- IDUINO module ST1146 for recording the sounds
- JOY-IT relay COM-KY019RM to activate the electric door opener
- For control and configuration, 3 buttons in green, white and red are required
- Capacitor 100 nF
- Resistance 470 Ohm
- Resistance 10K Ohm
- Trimmer 1K Ohm
- Diode 1N4001
There is an important point to consider when it comes to the power supply. Tests have shown that the USB port of a notebook provides a fairly clean 5 volt voltage and is well suited for the operation of the device. If the device is operated with a standard USB charger, the poorly smoothed DC voltage causes various interference frequencies, so that safe operation is not guaranteed. Therefore, I highly recommend using a good quality separate power supply.
The software
The low frequency signal is fed to one of the Arduino's analog inputs. The first step was to determine the frequency of this input signal. The proven Fast Fourier Transform method, or FFT method for short, is used here. You don't have to worry about the laborious process of creating the required functions, as the arduinoFFT library already has them. What required some experimentation was to find out which window function was best suited for frequency measurement. The Hamming and Hann window functions came into question, both of which have a sine shape. Both lead to a broad peak value and low secondary oscillations. The Hann window approaches zero at both ends, eliminating discontinuities. With the Hamming window, zero is not quite reached, so the signal can show slight discontinuities. Because of this difference, the Hamming window deletes the next side lobe better, but deletes all the others worse. Ultimately, numerous tests have shown that the Hann method is the most suitable variant for my application.
Since the upper limit of the frequency to be measured is 1976 Hz, this results in a sample rate of 4096 Hz, which results in a theoretical upper measured value of 2048 Hz. In order to achieve good accuracy with the determined frequency, I experimentally determined a correction factor, which is included in the calculation.
Next, it was necessary to create an intuitive menu structure to operate the device. After various designs I found a solution which you can see by viewing image FlowDiagram.png.
The start screen is located in permanent scan mode and shows the current frequency and, if available, the associated C major note. In order to achieve the highest possible hit rate, each grade up to a frequency deviation of +/- 9 Hz is recognized as valid. If the first tone of a stored sequence is recognized correctly, the program switches into the sequence validation mode and checks the complete sequence. Each tone should be kept at least 2 seconds before the next tone is reproduced. If the sequence test was successful, an appealing message is made, the relay is activated via an Arduino output port and the door opener releases the lock for about 3 seconds. If the sequence test was invalid, a corresponding note is reported and after about 3 seconds the start screen is displayed again.
To set the note sequence, the red Record button is pressed. A dialog appears in which a note can be selected using the white Select button. The selection is confirmed using the green OK button. A dialog follows asking whether another note should be added. Y or N can be selected using the Select button and the following dialog can be called up using the OK button. After 5 notes the maximum sequence size is reached and the start screen appears again. If you no longer remember the saved sequence, you can display it by pressing the OK button.
Since the saved note sequence should still be available after a power interruption, it is stored in the EEPROM.
Setup and start-up
The assignment of the connection pins of the Arduino Nano is chosen so that there is a 1:1 wiring with the LCD module. Since there are only a few components, I didn't use a circuit board and worked with flying wiring. The trimmer of the microphone module is adjusted so that only one LED lights up.
If you have a good singing voice, you can now try the C major scale. If a note is recognized, it will be displayed with the associated frequency. Of course, it is also possible to use a sound generator and save the corresponding sequence, for example on your smartphone, so that you can play it back later. However, playback depends very much on the volume of the smartphone used and the quality of the speaker. Sung directly, the volume was not a problem and the note recognition works very reliably.
Another note about the LCD module used: instead of the TC1604A-05 module, another variant can also be used, but you may then have to adapt the following line in the program code accordingly, if the columns count differs:
lcd.begin(16, 4); // Initialize LCD display with 16 columns and 4 rows
BTW
The device is also very suitable as a good mood booster at a party. Everyone tries to be a singer to crack the cursed acoustic lock. If it is successful, a siren sounds, for example.
Video
To demonstrate how this circuit works, I produced a short video:
Mises à jour de l'auteur