
Making a Solar Battery Charger
This project is going to show you how you should be charging a lithium 18650 cell by the help of the TP 4056 chip by utilizing the readily available solar energy.
This is a cheap project that will cost you around 10 dollars to implement. It is a project that am focused on building a simple cell charger or a portable power bank that will help you charge your Lithium 18650 cell by utilizing the solar energy from the sun which is readily and freely available.
Project requirement:
1. 5v Solar Cell .
2. Copper wires
3. 3.7 V 18650 battery
4. Battery protection board TP4056
5. General purpose PCB board
6. 2 x Screw terminal blocks (PCB)
7. Connecting cables/ Jumper wires.
8. Battery holder; 18650
9. General soldering equipment.
10. 1N4007 Diode; 1A
11.Power booster; 5V.
Project Description
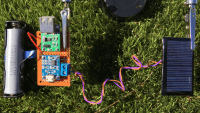
Having a close look at the board, you will notice that it ha the TP4056 battery protection chip and some few other components that will make the project work. On the board two LEDs red and green in color are attached. The red LED is always on when the battery is still charging and when the battery is fully charged, the blue one will be on. The mini USB connector helps in connecting the battery from an external USB charger. On the board there is this points marked as IN- and IN+, which we shall be utilizing to power this boards using our one cell 5V solar and the point marked as BAT- and BAT+ is where we connect our battery. For the board to charge this battery, the input voltage must be in the range of 4.5 and 5.5 volts.
Project requirement:
1. 5v Solar Cell .
2. Copper wires
3. 3.7 V 18650 battery
4. Battery protection board TP4056
5. General purpose PCB board
6. 2 x Screw terminal blocks (PCB)
7. Connecting cables/ Jumper wires.
8. Battery holder; 18650
9. General soldering equipment.
10. 1N4007 Diode; 1A
11.Power booster; 5V.
Project Description
Having a close look at the board, you will notice that it ha the TP4056 battery protection chip and some few other components that will make the project work. On the board two LEDs red and green in color are attached. The red LED is always on when the battery is still charging and when the battery is fully charged, the blue one will be on. The mini USB connector helps in connecting the battery from an external USB charger. On the board there is this points marked as IN- and IN+, which we shall be utilizing to power this boards using our one cell 5V solar and the point marked as BAT- and BAT+ is where we connect our battery. For the board to charge this battery, the input voltage must be in the range of 4.5 and 5.5 volts.
Discussion (1 commentaire(s))