
Neo_Pixel Rolling Message display for Control Room
By about at a twentieth cost you can have the same rolling message display for your workplace. Besides it's more colorful and consumes less power.
Neopixel display - An easy way of displaying
NEED arose for a rolling message display in one of our control rooms where we set up a new ash slurry pump control room. The display should have date, time, temperature, Relative Humidity. The traditional mono color LED display comes from our regular supplier for nothing less than a fortune [$625 with power unit & three years warranty ] besides for that we have to move a purchase requisition, indent, process and many more and the minimum time will be somewhere from a couple of weeks to a month.
I told the instrument supplier that by tomorrow evening he will have the display ready on the wall only I need a 220 volt AC socket nearby for connecting the power unit.
…
LEDs are great for display works. The are very bright, runs on just 5 volts, can make any color with RGB combinations and consumes very small power. Thus they are the best candidate for any display works. LEDs have been in display business for last 25 years.
Powerful switch mode power supply [SMPS] with small form factor and switching MOSFETs are available in plenty to rush the required power to these bundle of LEDs as and when required.
To support the system small decade counters and shift registers are available in plenty for making up the display timer circuitry.
Therefore, the whole eco system comprises of RGB LEDS, MOSFETs, Counters & registers were thriving impressively. Then Adafruit replaces everything by addressable LEDs called Neopixel LEDs. It comprises of just one chip – WS2812 or it’s variant WS2811 and RGB LEDs tied to it and then each WS2812 is daisy chained with each other such that hundreds of RGB LEDS can be controlled easily. Controlling 600 RGB Neopixel LEDs this way is very common now-a-days.
The result of such invention is that the display circuitry now has become extremely simple !
For controlling 600 LEDs it requires just one wire [PWM connected] or two wires [for SPI connected]. The other two wires are just 5 volt or 12 volts supply ! The display is absolutely steady, bright and flicker free.
Otherwise for controlling 600 RGB LEDs one would have to handle 1801 wires [3*600+1 common anode or cathode]. By suitable multiplexing this could have been reduced to say 200 wires or further to 100 wires! But every multiplexing means the brightness is sacrificed and demand for high speed processor becomes more inevitable and not to talk of flickering display due to excessive multiplexing!
On the other hand for controlling Neopixel LEDs any micro controller like Arduino ATMEGA328 (16 MHz) is just sufficient. However, my preferred MCU is ESP8266 or ESP32 (32 bit dual core processor) as it is reasonably fast (160 MHz) besides WiFi and BLE [Bluetooth Low energy] is in built with which I can connect to WiFi network for accessing Internet!
The 8*8 RGB Matrix comprises of 64LEDs & WS2812 combination all built into one thin strip of about 60mm square base costs about $5 each from aliexpress.com
Not a baby task for Arduino: it’s time to say bye to Arduino...
For writing plain rolling messages comprises of words / sentences Arduino can handle the 6*8*8 neo-pixel display board but the moment I connect it with an RTC / GPS receiver it can’t handle both on top of that when I connect another I2C [the BME280] Arduino falls flat. Therefore, I grabbed an ESP8266 [ESP32 will work as well] and with a voltage shiftier IC [SN74HCT245N] to convert ESP8266 output which is 3.3 volt to the 5Volt level, the project worked flawlessly.
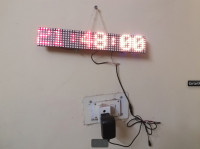
Rolling message display: 6 such 8*8 RGB matrix are tied up end to end. To support the thin body of the display I’ve put a scale on the back side for support. So it 384 RGB LEDs in total, is quite good enough to create small rolling messages.
For pressure, temperature and RH I’ve added one BME 280 and for timekeeping I’ve used RTC DS3231. However, for timekeeping I’ve two choices – Getting time from Internet using WiFi hotspot and then adjusting to local time [Sketch-1] or use a cheap DS3231 real time clock [Sketch-2].
Power supply unit: Each RGB LED when glows, takes about 20 mA current on 3.5 volt supply. That’s about 75 mWatt power. For each RGB lights together to produce bright white light ,takes about 225 mWatt power consumption. Now considering 6 nos 8*8 matrices together to create the effect, It’s better to have separate power supply sources for the display unit as well as the MCU unit. The ground or the zero volt connections of the both PSU to connect together. For full brightness ,it’s recommended to have 5 watt 5 volt power supply for the display unit and 5 volt 500 mWatt power supply for the MCU unit.
If you have an old desktop somewhere lying around the garage, take out it’s PSU and deploy it for this purpose. However, with less brightness set [see in the sketch] say at about 25% I’ve deployed one 5Volt 2Amp old phone charger. The display takes little time to start up. I’ve used a WeMOS D1 type ESP8266 unit which can take 5Volt supply in its vin pin.Arduino UNO cannot take RTC-DS3231 , NeoPixel and BME280 all together due to poor memory capacity.
Connections: The 8*8 matrices come in a neat package. Fix them with cellophane tape or glue gum on a support. I’ve used a 12 inches long scale for support. For our project here we have used 6 such matrices. However, you can use more on the column wise or row wise [in any direction] but you have to make changes accordingly in the sketch – see the comment section of the sketches for matrix declarations. Each matrix has 6 pins in 2*3 rows. [V+, Gnd , In] and [V+, gnd, Out]. Arrange them symmetrically such that the all ‘In’ pins are placed on one side and the ‘Out’ pins on the other side in symmetrical fashion – else the display will be fragmented.
Connect all V+ together, all Grounds together and connect the ‘Out’ of the first to the ‘In’ of the next. Change the Matrix declarations accordingly in parameter sections.
Schematics: [Total 6 ,8*8 matrices are connected one after another here]
BOM:
8x8 RGB Neo-Pixel 6 nos = $30
SN74HCT245N = $0.5
ESP8266 = $3
DS3231 = $1
BME280 = $2.5
power supply, 5Volt, 5Amp = $10
Total = $47
Word of caution:
Neopixels can get bad easily. While connecting the NeoPixel matrices , connect the ground pin first, then signal pin and at the last connect the +Ve pin. While removing also remove the +ve pin first, then signal pin and at the last remove the ground pin. Also never connect more than recommended voltage on a neopixel matrix. The display may work without SN74HCT245N but during voltage fluctuations it will create lots of colored flickers. Therefore, the voltage shiftier IC is recommended.
Prototype:
Now ready at my lab. Tomorrow it will be deployed at the ASPH control room.
Aftermath: Since making & working of such type of display is so easy that creating any tailor made display is just a matter of fixing the matrices, changing the matrix declaration sections in the sketch and then upload it into the MCU. Some more changes need to be done like length of letters to display and the delay timing etc.
Youtube video link: https://youtu.be/As3zZuq3AG0
Software: attached as zip files [works both for ESP8266 & ESP32]
Bye bye
Bera S
Vindhyanagar / 08/12/2019
NEED arose for a rolling message display in one of our control rooms where we set up a new ash slurry pump control room. The display should have date, time, temperature, Relative Humidity. The traditional mono color LED display comes from our regular supplier for nothing less than a fortune [$625 with power unit & three years warranty ] besides for that we have to move a purchase requisition, indent, process and many more and the minimum time will be somewhere from a couple of weeks to a month.
I told the instrument supplier that by tomorrow evening he will have the display ready on the wall only I need a 220 volt AC socket nearby for connecting the power unit.
…
LEDs are great for display works. The are very bright, runs on just 5 volts, can make any color with RGB combinations and consumes very small power. Thus they are the best candidate for any display works. LEDs have been in display business for last 25 years.
Powerful switch mode power supply [SMPS] with small form factor and switching MOSFETs are available in plenty to rush the required power to these bundle of LEDs as and when required.
To support the system small decade counters and shift registers are available in plenty for making up the display timer circuitry.
Therefore, the whole eco system comprises of RGB LEDS, MOSFETs, Counters & registers were thriving impressively. Then Adafruit replaces everything by addressable LEDs called Neopixel LEDs. It comprises of just one chip – WS2812 or it’s variant WS2811 and RGB LEDs tied to it and then each WS2812 is daisy chained with each other such that hundreds of RGB LEDS can be controlled easily. Controlling 600 RGB Neopixel LEDs this way is very common now-a-days.
The result of such invention is that the display circuitry now has become extremely simple !
For controlling 600 LEDs it requires just one wire [PWM connected] or two wires [for SPI connected]. The other two wires are just 5 volt or 12 volts supply ! The display is absolutely steady, bright and flicker free.
Otherwise for controlling 600 RGB LEDs one would have to handle 1801 wires [3*600+1 common anode or cathode]. By suitable multiplexing this could have been reduced to say 200 wires or further to 100 wires! But every multiplexing means the brightness is sacrificed and demand for high speed processor becomes more inevitable and not to talk of flickering display due to excessive multiplexing!
On the other hand for controlling Neopixel LEDs any micro controller like Arduino ATMEGA328 (16 MHz) is just sufficient. However, my preferred MCU is ESP8266 or ESP32 (32 bit dual core processor) as it is reasonably fast (160 MHz) besides WiFi and BLE [Bluetooth Low energy] is in built with which I can connect to WiFi network for accessing Internet!
The 8*8 RGB Matrix comprises of 64LEDs & WS2812 combination all built into one thin strip of about 60mm square base costs about $5 each from aliexpress.com
Not a baby task for Arduino: it’s time to say bye to Arduino...
For writing plain rolling messages comprises of words / sentences Arduino can handle the 6*8*8 neo-pixel display board but the moment I connect it with an RTC / GPS receiver it can’t handle both on top of that when I connect another I2C [the BME280] Arduino falls flat. Therefore, I grabbed an ESP8266 [ESP32 will work as well] and with a voltage shiftier IC [SN74HCT245N] to convert ESP8266 output which is 3.3 volt to the 5Volt level, the project worked flawlessly.
Rolling message display: 6 such 8*8 RGB matrix are tied up end to end. To support the thin body of the display I’ve put a scale on the back side for support. So it 384 RGB LEDs in total, is quite good enough to create small rolling messages.
For pressure, temperature and RH I’ve added one BME 280 and for timekeeping I’ve used RTC DS3231. However, for timekeeping I’ve two choices – Getting time from Internet using WiFi hotspot and then adjusting to local time [Sketch-1] or use a cheap DS3231 real time clock [Sketch-2].
Power supply unit: Each RGB LED when glows, takes about 20 mA current on 3.5 volt supply. That’s about 75 mWatt power. For each RGB lights together to produce bright white light ,takes about 225 mWatt power consumption. Now considering 6 nos 8*8 matrices together to create the effect, It’s better to have separate power supply sources for the display unit as well as the MCU unit. The ground or the zero volt connections of the both PSU to connect together. For full brightness ,it’s recommended to have 5 watt 5 volt power supply for the display unit and 5 volt 500 mWatt power supply for the MCU unit.
If you have an old desktop somewhere lying around the garage, take out it’s PSU and deploy it for this purpose. However, with less brightness set [see in the sketch] say at about 25% I’ve deployed one 5Volt 2Amp old phone charger. The display takes little time to start up. I’ve used a WeMOS D1 type ESP8266 unit which can take 5Volt supply in its vin pin.Arduino UNO cannot take RTC-DS3231 , NeoPixel and BME280 all together due to poor memory capacity.
Connections: The 8*8 matrices come in a neat package. Fix them with cellophane tape or glue gum on a support. I’ve used a 12 inches long scale for support. For our project here we have used 6 such matrices. However, you can use more on the column wise or row wise [in any direction] but you have to make changes accordingly in the sketch – see the comment section of the sketches for matrix declarations. Each matrix has 6 pins in 2*3 rows. [V+, Gnd , In] and [V+, gnd, Out]. Arrange them symmetrically such that the all ‘In’ pins are placed on one side and the ‘Out’ pins on the other side in symmetrical fashion – else the display will be fragmented.
Connect all V+ together, all Grounds together and connect the ‘Out’ of the first to the ‘In’ of the next. Change the Matrix declarations accordingly in parameter sections.
Schematics: [Total 6 ,8*8 matrices are connected one after another here]
BOM:
8x8 RGB Neo-Pixel 6 nos = $30
SN74HCT245N = $0.5
ESP8266 = $3
DS3231 = $1
BME280 = $2.5
power supply, 5Volt, 5Amp = $10
Total = $47
Word of caution:
Neopixels can get bad easily. While connecting the NeoPixel matrices , connect the ground pin first, then signal pin and at the last connect the +Ve pin. While removing also remove the +ve pin first, then signal pin and at the last remove the ground pin. Also never connect more than recommended voltage on a neopixel matrix. The display may work without SN74HCT245N but during voltage fluctuations it will create lots of colored flickers. Therefore, the voltage shiftier IC is recommended.
Prototype:
Now ready at my lab. Tomorrow it will be deployed at the ASPH control room.
Aftermath: Since making & working of such type of display is so easy that creating any tailor made display is just a matter of fixing the matrices, changing the matrix declaration sections in the sketch and then upload it into the MCU. Some more changes need to be done like length of letters to display and the delay timing etc.
Youtube video link: https://youtu.be/As3zZuq3AG0
Software: attached as zip files [works both for ESP8266 & ESP32]
Bye bye
Bera S
Vindhyanagar / 08/12/2019
Mises à jour de l'auteur