
Elektor Uno R4 [150790]
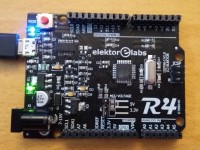
The Elektor Uno R4 is an Arduino Uno R3 equiped with the ATmega328PB-AU featuring 2x USART, 2x I2C and 2x SPI and much more.
This board is an evolution of the Arduino Uno R3 board. Identical form factor as the Uno but based on the ATmega328PB-AU, this board has much more features than the Uno. Because it is backwards compatible you can think of it as revision 4 of the Uno, which is why we called it the R4.
The circuit of the R4 is pretty close to the Uno. One of the main differences is the USB-to-serial converter for which I used an FTDI chip instead of another AVR. This saves on firmware/driver maintenance & device programming. The power supply is a bit stronger than on the Uno and of course we provided four extra connector pins to accomodate Port E of the ATmega328PB.
Here is a table that shows the main differences between the R3 and the R4.
There are some more differences, like the touch controller. Check the datasheet for details.
Drawing up the schematic was easy enough, the hard work is in the software. Because the Arduino IDE does not know about the ATmega328PB I had to build a Boards Package that provides the toolchain. How to do this properly is unfortunately not very well documented, making this a complicated task. Also the SPI and Wire libraries had to be modified to support multiple peripherals. More details about the IDE integration can be found in the Elektor Magazine article published in June 2016.
There are (unfortunately) several Boards Packages. There is one for Windows only that includes a full toolchain (Linux and Mac users can use it in a virtual machine), there are two others for Windows, Linux and OSX that do not need a toolchain (use these if you can). The Boards Packages can be downloaded from the Elektor.Labs space at GitHub.
Update November 18, 2020
The Elektor Uno R4's Boards Package has been updated to V2.0.0.
To install the Elektor Uno R4, paste the link https://github.com/ElektorLabs/Arduino/releases/download/v1.0.1/package_elektor_uno_r4_1_8_x_index.json in the 'Additional Boards Manager URLs' box of the IDE's Preferences window.
Tested with Arduino IDE 1.8.13
Update September 8, 2016: The Boards Packages have been updated:
With these new packages you have access to an 8 MHz version of the bootloader for boards running on the internal RC oscillator or on an external 8 MHz crystal, good for low-voltage applications. In the IDE you can choose between 16 MHz and 8 MHz R4 boards.
Note that the Boards Packages also include the source code for the bootloader plus batch files that show you how to compile it allowing you to create your own custom bootloader. If you need a suitable toolchain (Windows only), you can download avr-gcc-4.9.2-i686-mingw32.zip from the Elektor.Labs space at GitHub.
Update August 10, 2016: a special Boards Package for Arduino IDE 1.6.10 has been added to the repository. Use https://github.com/ElektorLabs/Arduino/releases/download/v1.0.1/package_elektor_uno_r4_1_8_x_index.json
This package also works with 1.6.11 and hopefully also the future versions 1.6.1x.
Update June 23, 2016: a new R4-only Boards Package supporting Windows, Linux and OSX is now also available. This package does not need a new toolchain. See below for details.
Installation
Use the Arduino IDE (v1.6.6 or higher, do not use an IDE from arduino.org) Boards Manager to install this package, as follows:
3V3 & battery operation
Officially the MCU is not specified for 3V3 @ 16 MHz, but for me it works fine. If it doesn't, it is easy enough to replace the crystal by an 8 MHz one. An even simpler solution is to leave the 16 MHz crystal on the board, but reprogram the fuses (extended = 0xf5, high = 0xde, low = 0xe2) to make the MCU use its internal 8 MHz oscillator.
For other low voltage sources (i.e. battery) disconnect the MCU VCC line by opening JP1 (and removing R7 if present). Connect the external voltage source in this case to the middle pin of JP1 (or to IOREF on K5).
Important
New peripherals in sketches
The Elektor Uno R4 has more hardware peripherals than the R3 and so the Arduino libraries have been upgraded to support them. In your sketches you can now use:
Bootloader & fuses
The Elektor Uno R4 bootloader can, of course, be found on GitHub, and it is included in the Boards Package so if you installed that you already have it on your computer, but for your convenience it is also available in the download section below. This download includes avrdude and an example command line to make things easier for you.
An 8 MHz bootloader is included in the Boards Package, ex. c:\Users\[USER]\AppData\Local\Arduino15\packages\Elektor-Uno-R4-for-Arduino-1.6.10\hardware\avr\1.0.1\bootloaders\R4\optiboot_elektor_uno_r4_8mhz.hex
The fuses should be set like this (like an Arduino Uno R3):
Extended fuse byte: 0xf5 (or 0x05 depending if avrdude gets it or not)
High fuse byte: 0xde
Low fuse byte: 0xff (0xe2 for 8 MHz internal oscillator)
Video
The circuit of the R4 is pretty close to the Uno. One of the main differences is the USB-to-serial converter for which I used an FTDI chip instead of another AVR. This saves on firmware/driver maintenance & device programming. The power supply is a bit stronger than on the Uno and of course we provided four extra connector pins to accomodate Port E of the ATmega328PB.
Here is a table that shows the main differences between the R3 and the R4.
| Arduino Uno R3 | Elektor Uno R4 | |
|---|---|---|
| USART | 1 | 2 |
| SPI | 1 (2 counting USART) | 2 (4 counting USART) |
| I2C | 1 | 2 |
| GPIO | 20 | 24 |
| Analog in | 6 | 8 |
| PWM | 6 | 9 (10 internal) |
| Timer | 6 | 9 |
| OCM | - | 1 |
There are some more differences, like the touch controller. Check the datasheet for details.
Drawing up the schematic was easy enough, the hard work is in the software. Because the Arduino IDE does not know about the ATmega328PB I had to build a Boards Package that provides the toolchain. How to do this properly is unfortunately not very well documented, making this a complicated task. Also the SPI and Wire libraries had to be modified to support multiple peripherals. More details about the IDE integration can be found in the Elektor Magazine article published in June 2016.
There are (unfortunately) several Boards Packages. There is one for Windows only that includes a full toolchain (Linux and Mac users can use it in a virtual machine), there are two others for Windows, Linux and OSX that do not need a toolchain (use these if you can). The Boards Packages can be downloaded from the Elektor.Labs space at GitHub.
Update November 18, 2020
The Elektor Uno R4's Boards Package has been updated to V2.0.0.
- The ATmega328PB is now fully supported by the Arduino IDE's default AVR toolchain. This makes installation of the Elektor Uno R4 much faster as there is no longer a special toolchain to download. It makes the board also future proof as new toolchain features are used automatically.
To install the Elektor Uno R4, paste the link https://github.com/ElektorLabs/Arduino/releases/download/v1.0.1/package_elektor_uno_r4_1_8_x_index.json in the 'Additional Boards Manager URLs' box of the IDE's Preferences window.
Tested with Arduino IDE 1.8.13
Update September 8, 2016: The Boards Packages have been updated:
- Fix SoftwareSerial problem (found working up to 115,200 baud with an MCU clock of 16 MHz)
- Add Optiboot 8 MHz bootloader
- Add 8 MHz boards
With these new packages you have access to an 8 MHz version of the bootloader for boards running on the internal RC oscillator or on an external 8 MHz crystal, good for low-voltage applications. In the IDE you can choose between 16 MHz and 8 MHz R4 boards.
Note that the Boards Packages also include the source code for the bootloader plus batch files that show you how to compile it allowing you to create your own custom bootloader. If you need a suitable toolchain (Windows only), you can download avr-gcc-4.9.2-i686-mingw32.zip from the Elektor.Labs space at GitHub.
Update August 10, 2016: a special Boards Package for Arduino IDE 1.6.10 has been added to the repository. Use https://github.com/ElektorLabs/Arduino/releases/download/v1.0.1/package_elektor_uno_r4_1_8_x_index.json
This package also works with 1.6.11 and hopefully also the future versions 1.6.1x.
Update June 23, 2016: a new R4-only Boards Package supporting Windows, Linux and OSX is now also available. This package does not need a new toolchain. See below for details.
Installation
Use the Arduino IDE (v1.6.6 or higher, do not use an IDE from arduino.org) Boards Manager to install this package, as follows:
- Open the Arduino IDE's Preferences dialog: File -> Preferences
- Windows users only (this package includes avr-gcc 4.9.2): add the URL https://raw.githubusercontent.com/ElektorLabs/arduino/master/package_elektor_boards_index.json to the edit box "Additional Boards Manager URLs". (It is possible to have multiple URLs as long as you separate them with commas.) This URL is long and finishes with "json", make sure you copy all of it. You can also copy it from here.
- Windows/Linux/OSX users (this package works with the default Arduino toolchain): add the URL https://raw.githubusercontent.com/ElektorLabs/arduino/master/package_elektor_uno_r4_index.json.
Arduino IDE 1.6.1x and 1.8.x users must use https://github.com/ElektorLabs/Arduino/releases/download/v1.0.1/package_elektor_uno_r4_1_8_x_index.json - Open the IDE's Boards Manager: Tools -> Board -> Boards Manager
- As Type (upper left corner) select Contributed. You should now see at least one entry for Elektor boards.
- Click on the entry that you want to install to make the install button appear.
- Click the Install button to install the boards.
- Close the dialog when done.
- Now when you open the available boards list (Tools -> Board) there will be a header "Elektor Labs" followed by the Elektor boards. Choose the one you need.
3V3 & battery operation
Officially the MCU is not specified for 3V3 @ 16 MHz, but for me it works fine. If it doesn't, it is easy enough to replace the crystal by an 8 MHz one. An even simpler solution is to leave the 16 MHz crystal on the board, but reprogram the fuses (extended = 0xf5, high = 0xde, low = 0xe2) to make the MCU use its internal 8 MHz oscillator.
For other low voltage sources (i.e. battery) disconnect the MCU VCC line by opening JP1 (and removing R7 if present). Connect the external voltage source in this case to the middle pin of JP1 (or to IOREF on K5).
Important
- The bootloader must be adapted to the MCU clock frequency, otherwise the baud rate will be wrong. 8 MHz Optiboot bootloaders are included in the Elektor Uno R4 Boards Package distribution, ex. c:\Users\[USER]\AppData\Local\Arduino15\packages\Elektor-Uno-R4-for-Arduino-1.6.10\hardware\avr\1.0.1\bootloaders\R4\optiboot_elektor_uno_r4_8mhz.hex.
- To use the internal 8 MHz oscillator set the low fuse byte to 0xe2.
- Make sure R7 is not mounted when you want to power the MCU from 3V3 or a battery.
New peripherals in sketches
The Elektor Uno R4 has more hardware peripherals than the R3 and so the Arduino libraries have been upgraded to support them. In your sketches you can now use:
- Serial and Serial1
- Wire & Wire1 (or I2C0 and I2C1, include the Wire library), Wire and I2C default to I2C0
- SPI0 and SPI1 (include the SPI library), SPI defaults to SPI0
- digitalRead/Write now also work on pins 20 to 23 (port E)
- analogWrite now also works on pins 0, 1 and 2
- analogRead accepts A6 and A7
Bootloader & fuses
The Elektor Uno R4 bootloader can, of course, be found on GitHub, and it is included in the Boards Package so if you installed that you already have it on your computer, but for your convenience it is also available in the download section below. This download includes avrdude and an example command line to make things easier for you.
An 8 MHz bootloader is included in the Boards Package, ex. c:\Users\[USER]\AppData\Local\Arduino15\packages\Elektor-Uno-R4-for-Arduino-1.6.10\hardware\avr\1.0.1\bootloaders\R4\optiboot_elektor_uno_r4_8mhz.hex
The fuses should be set like this (like an Arduino Uno R3):
Extended fuse byte: 0xf5 (or 0x05 depending if avrdude gets it or not)
High fuse byte: 0xde
Low fuse byte: 0xff (0xe2 for 8 MHz internal oscillator)
Video
Mises à jour de l'auteur